Krita 4.0.1 Workflow for painting with masks (post in progress)

Notes to self on painting multiple images separately to be collated later into a map poster.

When would I use this workflow:

  • for images which have areas of paint that are connected in some way, like a watercolour painting of an ink sketch – almost thinking like a vector illustration?.
  • for images where the colour is filling in an ink sketch – easy to change the colours and repaint elements
  • for images where there are 3 or 4 elemtns which will be trated the same way (eg – colouring an architectural ink sketch – wood slats /window panes / window frames/ plastering all would be treated in their own separate ways and coloured the same throughout the sketch wherever they appear).
  • when I needing to paint without focusing on the boundary of the thing being painted – when the boundary might change and enlarging something with paint would not look good ( = need to use masks and alter the mask only, not the paint layer).

Remember to set up template to use for each image (consistent image size, resolution, consistent watercolour paper (set to multiply))

Make a note of the pixel size of any pen used, and the pens used for each sub-image. (Develop palette for the colour of items used across images (eg linework).

Thing to remember: when you turn a layer into a mask, it then attaches as a mask to the layer ABOVE in the layer stack.


Workflow

(1) Paper layer

Watercolour paper png set to multiply. Keep this layer at the very top of the layer pile.

(2) Colorizing ink sketch.

Setup

  • Have ink sketch on its own layer. No further changes are to made to this layer. Lock when not in use.
  • Note to self: Have outer, thicker sketch lines on a different layer from the thinner inner sketch lines: easier to test whether image looks better with no inner sketch lines etc later on.

Colorizing:

  • Create new layer ABOVE ink sketch layer. Fill the whole layer with the desired colour.
    • Note: colour entire layer at first, but later, try painting different colours over where the inner and outer sketch lines are?
  • Click on ink sketch layer. Choose from Menu Filter > Adjust > Invert (or press CTRL + I)
  • Click on ink sketch layer. Right click on Layer name, choose Convert > choose To Transparency Mask
    • Ink sketch layer is now a transparency mask of the colour layer above, shown indented in under the colour layer in the layer stack.
    • To change ink sketch, click on that layer in the layer stack to activate it and when drawing remember to use a pen with white colour to add changes, or black colour to erase stuff.
    • To change colours of lines, click on the colour layer (the main layer) in the layer stack to activate it and paint on it in the desired colour.
    • Note: can copy the mask layer and attach it to another layer (drag and drop on the other layer – takes some practice to drag to the right spot under the new colour layer.)

(3) Set up layers for colouring major elements in the image

Create the mask layer

  • Create a new layer. Call it for example ¨Mask_Window Panes¨ or¨Mask_White items¨
  • Work on this new layer (lock all other layers?) Using the various Selection tools, select all the areas that will be coloured in common (eg, all the window panes). Usually use the polygon selection tool or the pen selection tool. Trace relevant areas visible in ink sketch (which is on a locked layer below).
  • When selecting a new area, add it to the existing selection by holding SHIFT down while selecting.
  • When done, paint-bucket-fill the entire area with the whitest WHITE.

Create the colour layer

  • Create a new layer ABOVE the mask layer. Call it something like ¨Window Panes¨ – depending on what I called the mask layer etc.
    • Paint as desired (eg – large watercolour paint area).

Attach the mask to the colour layer.

  • Right click on the mask layer and choose Convert > choose To Transparency Mask.
    • The mask layer is now attached to the colour layer which was above it in the layer stack.
    • To change mask boundaries, click on it in the layer stack to activate it, and when drawing remember to use a pen with white colour to add changes, or black colour to erase stuff.
    • To change colours of paint layer, click on the colour layer (the main layer) in the layer stack to activate it and paint on it in the desired colour.


Krita 4: Copying Text and Vector Objects from Inkscape

[Written prior to the update of the text Tool in Krita 4. Text work done first in Inkscape for copying to Krita 4.]

Method 1: Simple Copying from Inkscape to Krita 4

(1) Prepare the text or vector object first in Inkscape (see Deforming text post).

(2) Select the element individually, copy them (Ctrl + C). Open a Vector layer in the Krita window (name it), select/activate that layer, and paste the element (Ctrl + V).

If wanting to adjust the size of each element after pasting, create a new layer in Krita 4 for each element. The layers can be merged together later (if required). I found that if I copied and pasted multiple objects from Inkscape into the same layer in Krita 4, I was still unable to edit them individually as objects using the Button_Transform a selection Transform a layer or selection button.

For this method: Don’t group the elements together in Inkscape (in an attempt to copy them in one go): unless you are certain that you won’t need to move them in relation to each other again.

Also, I sometimes had problems where I grouped material together in Inkscape (below left) and then pasted into Krita (below right). Some elements in the group were pasted with a different relative size. I was unable to ¨ungroup¨ the elements in Krita to easily edit them individually again.


Method 2: Copying many elements from Inkscape > Krita 4 in one go.

(1) Prepare the text or vector object first in Inkscape (eg. see Deforming text post).

Note to self: Krita 4 does ordinary text just fine, so only bother copying text across from Inkscape if that makes it easier to keep track of stuff etc. Otherwise, just do the text in Krita 4.

SAVE THE FILE IN INKSCAPE AS AN INKSCAPE SVG AND THEN MAKE A DIFFERENT COPY TO WORK ON.

Later steps will flatten the visible image into one and only one vector layer, and will include only layers that were visible when saved. Toggle any unwanted layers to be not visible before saving.

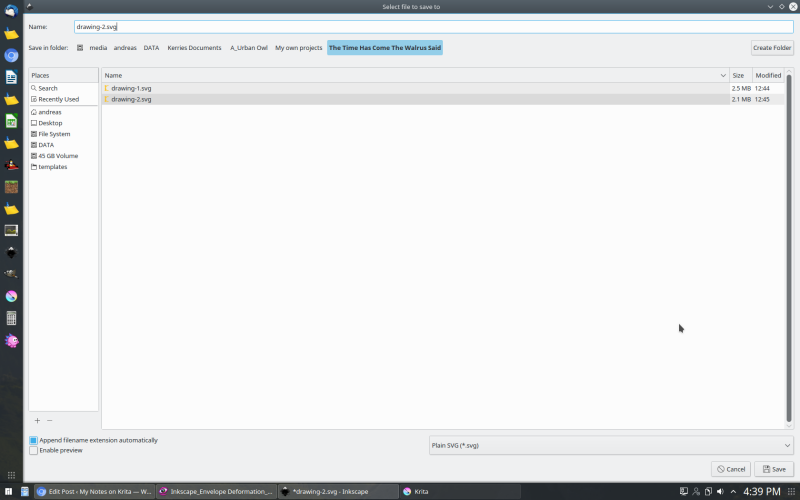
(2) Save the file in Inkscape as a plain svg file (rather than an Inkscape svg file) then close it.

Inkscape_saving plain svg

(3) Open the plain svg file just saved in Krita.

(4) The entire image previously worked on in Inkscape appears as a single vector layer now in Krita. Selecting an element, selects all the elements in the image with the same effect as if they were ¨grouped¨ together in Inkscape. Although the individual elements look editable, I could not find a way to do so. It still appeared like a rasterised image, however, all the elements retained their size relative to each other.  [Note to self: edit post when bug fixed in Krita]. Now I can cut and paste between Krita windows.

Pasting text as ¨text¨ from Inkscape to Krita 4

When text is pasted as text (ie – I did not already convert the text to a ¨path¨ in Inkscape) from Inkscape into Krita, the object looks like this (below), and the Select Shapes Tool Shape manipulation Button Only button is highlighted. Although the object looks editable, while the Shape manipulation Button Only is active, I can only move it.
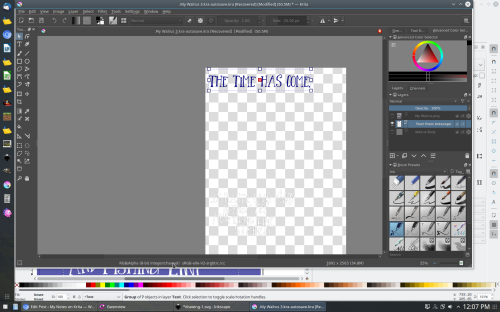
Inkscape_pasted vector

To adjust the size of the object, etc, click on the Button_Transform a selection Transform a Layer or Selection Button.

The text, text colour and stroke size etc etc etc can be further edited in Krita 4 by selecting the object with the Shape manipulation Button Only and then clicking on the text Button only in the usual manner.

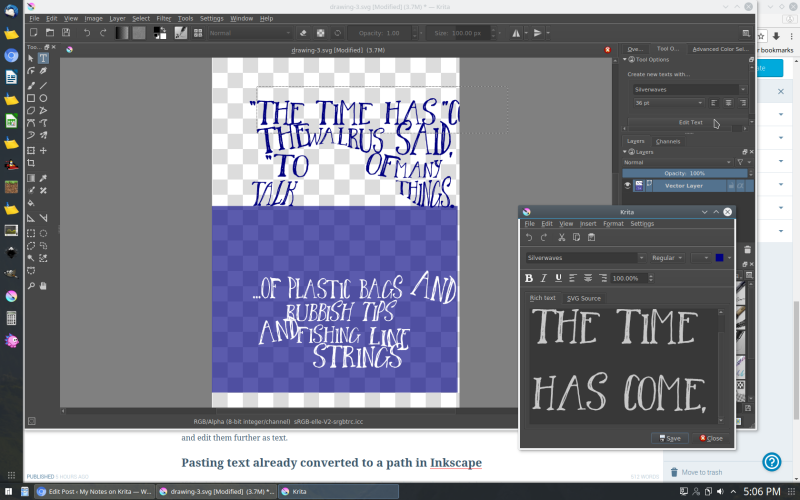
This still applies, even if I have used Method 2 above, resulting in an apparently amorphous vector layer containing both objects which are text and objects which are text already converted to a path. In Krita, I can still click on the items which are pure text and edit them further as text. When I select such an item (eg, the text object below ¨The time has come¨) it is not immediately apparent that I can edit it, but the text tool options in the toolbox to the right are now active and if I click on the ¨Edit Text¨ button, the Text Editor window pops open.

Inkscape_editing text in Krita

Pasting text already converted to a path in Inkscape

If I had already converted the text to a path (for example, to deform the text in Inkscape), then obviously I am cutting and pasting a ¨path¨, not ¨text¨ – even though it still looks like text. The text is obviously no longer editable as ¨text¨ via the text tool (and I would not expect it to be). However, I could not find a way to edit the individual letters as vector paths in Krita 4, despite them each appearing to have their own dotted boxes in Krita 4. [Note to self – check if this bug has been reported]

What to do in the meantime:

  • use Method 1 to copy and paste individual items from Inkscape to Krita 4.
  • keep the Inkscape window open in the background to do further editing on the elements and re-paste them into Krita if need be.


Inkscape: Deforming Text

The text features of Krita 4 are still being developed (at the time of writing this), so I am working in Inkscape to do some text deformation. I much prefer drawing the central image of this design in Krita 4, so for now I am just sorting the text out in Inkscape (as it is now possible to cut and paste elements from an Inkscape window directly into a Krita 4 window).

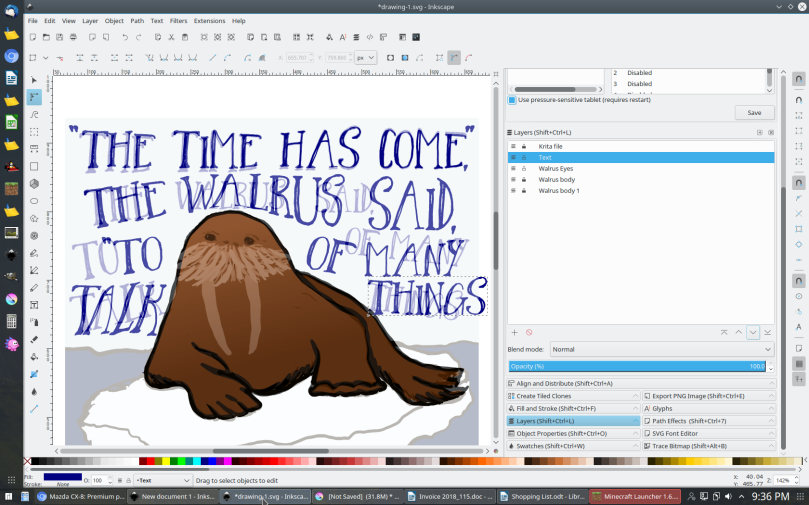
Very early stages of this design below! The sketch of the walrus and the text placement is visible as a semi-transparent layer underneath.

Inkscape_Convert Text to Path

Before deforming text, make sure any editing of the text is done first (ie – spelling)

To deform text:

(1) Enter any words that might need to be deformed individually as individual text objects. (That is, click on the text icon anew for each such word. Note to self: can separate text, but easier to just plan ahead).

(2) Using the “Select and Transform Objects¨ tool  Shape manipulation Button Only, select the object (in this case, the word “Things”: a dotted square forms around the object.

(3) From the menu, choose Path > Object to Path.

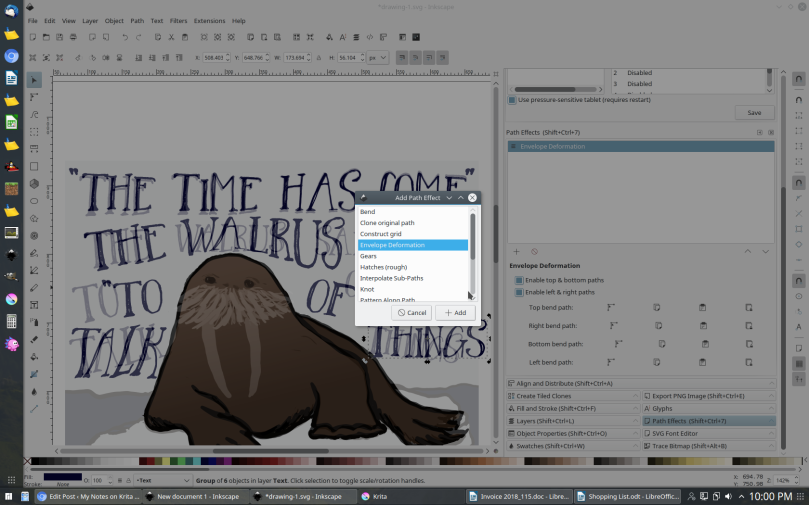
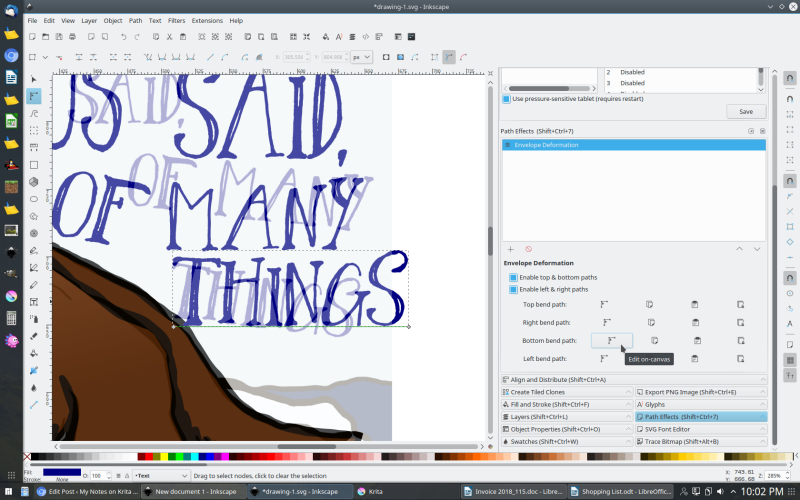
(4) Click on the Path Effects tab at the bottom right of the screen, and then click on the + plus sign to add an effect: choose Envelope Deformation in the dialogue box that pops up.

Inkscape_Path Effects_Envelope Deformation

If the plus sign does nothing, then you forgot to turn the text to a path, or you clicked on something in between following the steps above (if so, select is again and re-try).

(5) Edit the left, upper, right, bottom paths of the envelope individually. To choose one, click on the path editing icon to the right of the path description (see screenshot). The relevant path will pop up green in the image: adjust like any path.

Inkscape_Envelope Deformation_Editing

You can enter and exit this envelope editing process.

For example, I can click on the “Select and Transform Objects¨ tool  Shape manipulation Button Only and move the object, transform or resize the entire object and then reclick on the Path Effects tab in the bottom right of the screen, and keep editing the envelope.

Editing the ends of adjacent paths.

If edit the end of the one path (eg – bottom node of envelope’s right side path), the corresponding start of the adjacent path (eg – left node of envelope’s bottom side path) is not automatically moved. The discrepency may look good, but if something looks awry after editing, try making sure that the corresponding nodes of adjacent paths are located in roughly the same spot as their equivalent nodes in the adjacent paths.

The entire object must be selected when editing the envelope.

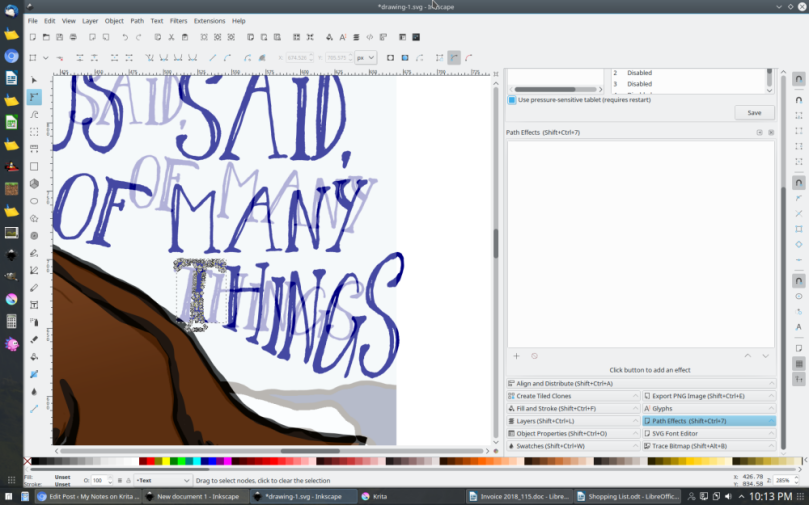
When the envelope is being edited, the Inkscape_Path Editing Button path editing button is highlighted automatically. However, this means that if you accidentally click on an individual letter (which is really an individual path) then, you exit the envelope deformation editing and all the nodes of that letter become editable as shown below.

Inkscape_Envelope Deformation_Accidentally selecting

To return to editing the envelope, select the “Select and Transform Objects¨ tool  Shape manipulation Button Only  again, and select the entire object (the dotted border will appear around it again). Select the Path Effects tab again, and return to editing. Note that in doing so, the  path Inkscape_Path Editing Buttonediting button is highlighted automatically – so be careful to not go round in circles and select individual letters. Just work on the envelope’s path – which gets highlighted in green when selected for editing (see above).

Adjusting individual letters nodes

Sometimes the envelope deformation leaves a letter not quite right. To adjust the letter, make sure the path Inkscape_Path Editing Buttonediting button is highlighted, then click on the letter. All the nodes in the letter will now be visible (see below) and editable in the usual way one edits nodes of a path. However, the letter’s nodes will appear in the original place that the letter stood, not in the deformed position created by the envelope deformation path  effect. However, regardless, editing the nodes of the letter will be immediately reflected in the letter in its deformed position.

Inkscape_Envelope Deformation_Accidentally selecting